Step 2. Add your files
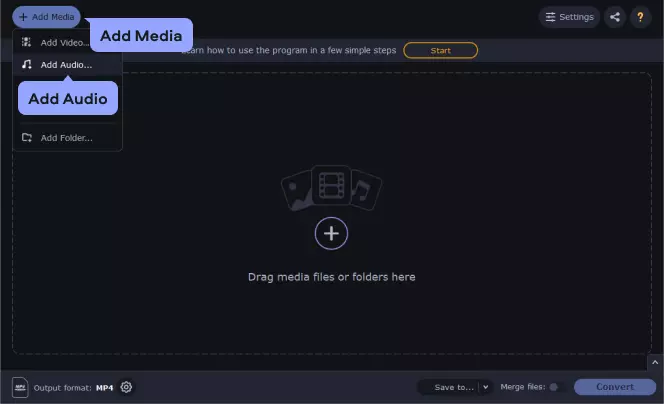
Click Add Media, then Add Audio, and select the MP3 file you want to change to M4A. You can also select multiple files for batch conversion, which you usually can’t do with an MP3-to-M4A converter online.
Need to Convert MP3 to M4A?
Try our MP3 to M4A converter online!
Looking for a fast and free MP3-to-M4A converter? Then try this online app. With it, you can convert a track from MP3 to M4A online in a few clicks. For faster batch conversion, use a desktop program.
What is an M4A file? M4A is an extension for an audio file encoded with AAC (Advanced Audio Coding) or ALAC (Apple Lossless Audio Codec). It is a common extension for audio imported from CDs using iTunes. M4A files sound better and have a smaller size compared with MP3, which is why you might want to convert your MP3s to this format. This can be easily done with Movavi’s MP3-to-M4A converter. Read this guide to learn how to convert MP3 to M4A with Movavi’s software.
How to convert MP3 to M4A with the Movavi program for Windows and Mac
Unlike many MP3-to-M4A file converters, Movavi’s converter doesn’t require any special skills or knowledge of media formats. It’s designed to be simple and easy-to-use, so the conversion can be done in just a few clicks. The app can convert MP3 to M4A on Windows and Mac alike.
Step 1. Install the .mp3-to-.m4a converter
Download the installation file for Movavi’s MP3-to-M4A converter and run it on your computer. Follow the instructions on the screen to install the app.
Step 2. Add your files
Click Add Media, then Add Audio, and select the MP3 file you want to change to M4A. You can also select multiple files for batch conversion, which you usually can’t do with an MP3-to-M4A converter online.
Step 3. Compress your MP3 files (optional)
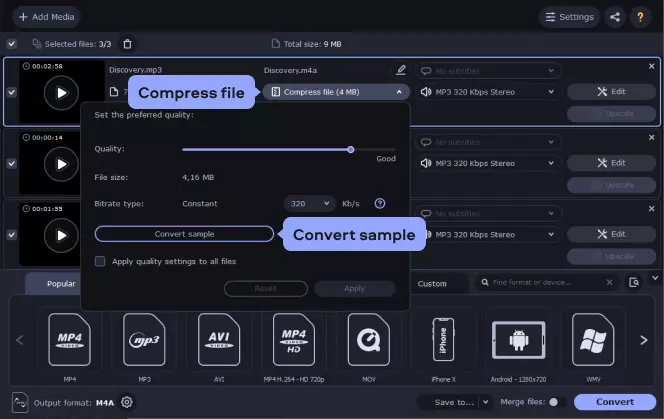
To reduce the size of a music file, click the Compress file in the description section. In the pop-up window that appears, choose the desired quality, bitrate, and size. Click Convert sample to get a small sample of your file for checking.
Step 4. Convert your files to M4A
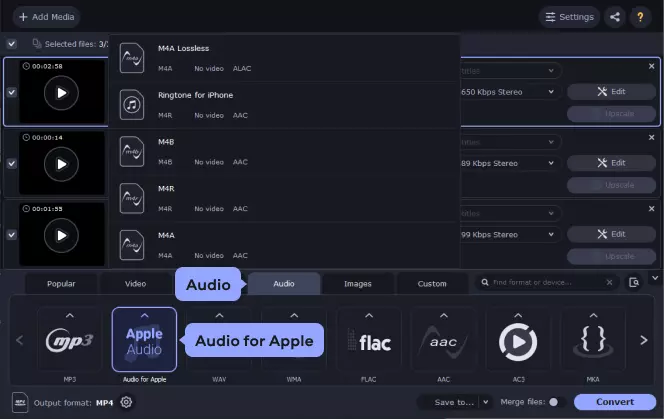
Go to the Audio tab, then click the Audio for Apple icon and select M4A as the output format.
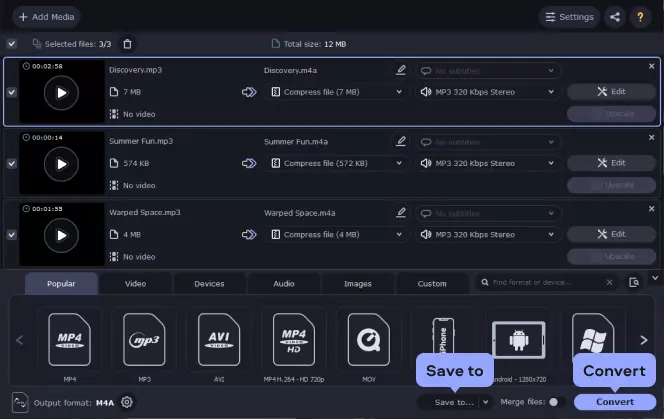
Click Save to and select the folder in which the converted files will be saved. By default, the files will be saved to the Movavi Library folder. Click Convert to start the conversion process. The folder with the converted files will open automatically when the conversion is complete.
The biggest difference between MP3 and M4A is the quality: M4A files sound much better. Surprisingly, they are also smaller in size, which is one more reason for converting MP3 to M4A. To learn more about the differences, check out the MP3 vs. M4A comparison table below.
Here’s what Movavi’s team does to provide you with verified information:
When selecting products to include in our reviews, we research both demand and popularity.
All the products covered in this article have been tested by our team.
When testing, we compare key characteristics, including supported input and output formats, quality loss when converting, and other significant features.
We study user reviews from popular review platforms and make use of this information when writing our product reviews.
We collect feedback from our users and analyze their opinions of Movavi software as well as products from other companies.

Movavi Video Converter
The ideal way to get your media in the format you need!
Frequently asked questions
See other useful how-to guides

Have questions?
Join for how-to guides, speсial offers, and app tips!
1.5М+ users already subscribed to our newsletter